Fisheye vs. wide angle lenses for shooting spherical panoramas

Comparison of fisheye lenses with wide angle lenses at equal focal lengths.

Here’s a post which is designed to save me a couple of emails per month, so please bear with me.

I often get asked (usually by people who saw my panoramic photography tutorial videos) if they can use a “regular” 8mm or 10mm wide angle lens instead of an 8mm or 10mm fisheye lens (on a camera with a 1.5x crop sensor is used) to produce full 360×180° panoramas.

The answer is: Of course you can, but you will need to take more images to cover the entire sphere. With both fisheye lenses, you can get away with as little as 4 images to cover everything — with the non-fisheyes you need a bare minimum of 12, but more like 16 shots to have captured everything.

Without wanting to get technical, this has to do with the field of view that both lens types offer (due to the different projections): The fisheye typically shows you much more than the wide angle since, grossly simplified, the fisheye “squeezes” things the more you move away from the center, whereas the wide angle lens tends to “stretch” things. In terms of numbers, both fisheyes give you a 180° field of view around the diagonal. The wide angle lenses in turn only give you 110-120°…

Click on the image above to see a quick visual comparison between the different lenses / images they produce. Pay particular attention to what is included and what is not included in the extreme corners.

Lenses used: Peleng 8mm ƒ/3.5 fisheye and Sigma 10mm ƒ/2.8 fisheye on a 1.5x crop sensor, and a Sigma 12-24mm on full frame sensor (to simulate 8mm/10mm on crop).
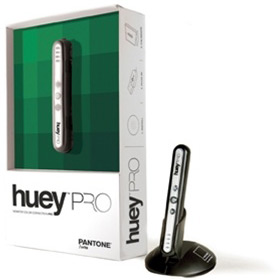
PANTONE is a nice company

I’d like to quickly report a great customer service experience.

About 4 years ago, I got myself a PANTONE huey to colour-calibrate my monitors. This is particularly important for photographers as it ensures that your monitor accurately reproduces colours. It comes in two version, the regular one, and the PRO version.

Now sadly there was a bit of an issue with mine, and sometimes the calibration would result in a slightly pinkish monitor image. Only sometimes however, and it was relatively easy to detect. Anyway, I read on some forum that you can write to PANTONE about it, and so I did, about a week ago.

Today UPS dropped off a brand new huey from them… No questions asked, and they even upgraded me to the PRO version (which costs a good bit more than the regular version I originally purchased) for free — not sure if this was a mistake or intentional.

In any case, that’s what I call decent customer service, and because they made me so happy, I’m writing about it here.

Would you like some fish?

Sophie taken with an ultra wide angle lens, Maynooth, Ireland, 2011

Here’s another weee trick that I came up with a couple of years back (but I’m sure other people must have discovered this too).

I stated earlier that it’s usually great fun to use wide angle lenses to photograph your little ones. It requires you to get in really close (otherwise the kid would be lost in the image) which in turn gives a great sense of “participation” or “immediacy” potentially leading to some captivating shots.

But there’s a problem: The corners of the image get stretched the more wide angle you go. This can lead to some rather unappealing distortions the further your subject (or parts of your subject) is away from the image centre. Have a look at this image for instance, which is the unedited version of the picture shown above. Yuk!

That said, fret not, there is a fix: The fisheye / barrel distortion. In LightRoom/Camera RAW just go to the lens correction section and play with some negative values in the “Distortion” field (in the manual tab). For instance, in the image at the top, I used -60 — and I think it looks much better than the original! If you didn’t shoot raw, you can still do this in Photoshop using the built-in Lens Correction plugin, or, alternatively, fiddle with the “Spherize” effect (or whatever it is called in your photo editing software).

As always, there are some downsides, mainly two. Fist, you lose some of the wide-angled-ness (again, compare the above shot with the original), and it’s a question of taste whether the artificially introduced distortion is acceptable (this is not very obvious here, but it will be much more noticeable when you have straight lines in the image).

Pssst, don’t tell anyone!

Sophie's second Halloween, Maynooth, 2010

Here’s a trick that I heard about a couple of years back and that I use every now and then.

Have you ever had a nice “keeper” image but that was ever so slightly out of focus? If you took it without using a flash and if there are some eyes in the image, here’s what you could try.

To make the image appear a bit sharper (this is going to be really dodgy…) add a small white dot just above each pupil of the main subject’s eyes, imitating what you would see if you had used a flash in the image. In LightRoom for instance, use the local adjustments tool, choose a very small brush size and set the exposure to +3EV. Then zoom all the way into the eyes and try hard to make out the reflection of the person with the camera. Then add a bright dot right there.

The reason for that is that you’re trying to locate a common reflection in both eyes in order to make your hack look more realistic (careful, our brains are extremely good at detecting any manipulations in the face, and in particular the eyes).

Clearly, this hack only really works if you’re not aware of it. So if you look at Sophie’s image real close, you will see that it is not 100% in focus — but only because you just read this post ;-)

With kids, go wide !

Reading in a box, Maynooth, 2011

I was recently asked by a young father about some recommendations regarding camera lenses. I know, gear talk is dry, but then, if you don’t have the right gear for the right job, you may be disappointed with the image you get otherwise.

If you remember my tips from a while ago, I like to use a macro lens to photograph little babies, as this allows you to get some really nice up close shots of your tiny little gem without it being lost in the frame (here’s a good example of a frame filling macro shot). Well, the young father already had a macro lens, so what next?

I’d say, get the “nifty fifty”. That’s a 50mm lens with a very bright aperture (typically in the ƒ/1.7 to ƒ/2.0 range) which costs you no more than a hundred bucks, in any camera system (of course you could also get ƒ/1.4, ƒ/1.2 or even ƒ/1.0 versions, but those will set you back much, much more). In any case, with these wonderful lenses — really the first additional lens you should be getting beyond your kit-lens — you will be able to achieve some extremely shallow depth of field, nicely separating your little smilies from potentially distracting backgrounds (here’s one such shot). Also, again thanks to the wide aperture, you will be able to take photos even in darkish lighting conditions without having to destroy the ambience with your onboard super nova.

But apart from that, go wide! Get a wide angle lens. With these lenses you are forced to get in close so that you’re right part of the action, and not just a by-standing observer. Robert Capa once said “If your pictures aren’t good enough, you’re not close enough.” He was a very wise man (and brilliant photographer)…

Side-light

Autumn on the NUIM South Campus, Maynooth, 2010

Apologies for slowly loosing track of what I’ve mentioned so far and what not, but in case I’m repeating myself — “Repetition is the mother of all learning”, or so it goes, right?

Anyway, here’s a lovely autumny shot from last year. It’s main feature; Side-light, also known as “rim light” (but I think the latter term is more used in portraiture).

In this present picture, the wonderful lighting really brings out the colours in the leafs, which also contrast beautifully against the blue sky (remember, blue and orange are complimentary colours…) and the dark shadows behind the church.

Quite a lot of fill light went into this (to bring out the details in the cathedral too which otherwise would have been left almost black due to the high contrast in the scene) — all major photo editing applications allow you to do this. However, as I keep saying, you have significantly more leeway for such manipulations if you shoot RAW.