Strobism

NUIM Volleyball Club, Maynooth, 2010

The title of this post refers to somewhat of a hype of recent years — use a bunch of small, portable flashes to light a scene in an interesting, unusual way.

Well, calling this a “hype” is probably too pejorative as there are tons of brilliant images coming out of this philsophy. Just check the blog of the “father” of strobism David Hobby.

So I wanted to try it out at some stage, and decided to do so with this group shot of last year’s university volleyball team (that I used to be in, but not anymore for lack of time). I used two flashes situated about two meters to the left and right of the camera, and triggered them wirelessly from the camera. As this is probably the simplest setup imaginable, I don’t dare calling this a great stobist set-up, but at least it’s in the spirit ;-)

Panorama video tutorials (1)

So what have I been doing lately, apart from not getting much sleep?

I’m in the process of recording a number panorama tutorial videos. I thought, it’s about time to give some more back to the greater internet community from which I have learnt so much over the last years.

The series shows my typical workflow for my panoramic photography. Here’s part 1, where I show my three favourite panorama shooting techniques. Hope you find it useful!

High Five

High Five, Maynooth, Ireland, 2010

Happy New Year to you all! High Five for another good one!

This is just a quick snap, lil’ Sophie on her mom’s back, on the way to the crèche, one beautiful autumn morning. Nothing too special, except a cute shot to get us all started into the new year. And a blatant application of the Rule of Thirds.

Resolutions? Well, of course. Finish Ph.D. and blog more ;-)

How about you?

College Chapel


facebook_thumb

=> Chapel, St. Patrick’s College Maynooth in NUI Maynooth.

Quite fitting to my three-part interview with the German Podcast “Happy Shooting, here’s my second-highest resolution panorama sofar — the inside of the beautiful College Chapel of the St. Patrick’s College in Maynooth.

This was shot with a regular lens, set to 24mm. This meant taking 29 images, three rows of 9 plus one up, one down.

It took a bit longer to shoot than expected… The place is typically empty — you can just walk in, if you know where to go and when the doors are not locked, but since it isn’t heavily advertised and Maynooth doesn’t really have hundreds of thousands of tourists running around, you hardly ever find someone else in the chapel. But that one day when I wanted to shoot this panorama, people out of nowhere constantly walked in and around. And asked questions. And tryed to not be in the picture, while, well, still being in the picture… But anyway, it all went well in the end and after a couple of hours of stitching, it was done!

Yay :-)

PS: Apparently, this place has the largest number of choir stands around. Everything needs a superlative, doesn’t it?

PPS: Merry belated Christmas!

Analogue Feel

Sophie backlit, Maynooth, Ireland, 2010

I think I mentioned this in the past, but (provided you shoot RAW) you can save a lot of images. Take this one for instance, which was badly underexposed (I wanted to take this picture quickly, but the camera was still in manual mode and the exposure was set for an outside scene).

Anyway, usually I delete pictures like that right away in camera, but when the little one’s in it, I try not to be too delete-happy — you never know.

And indeed, bringing the exposure up three stops (!) and thanks to the amazing dynamic range of modern digital cameras, there she is. Of course, pushing the exposure by this much brings in a ton of noise, but remember the old trick of turning the image black and white in such cases, and it usually won’t be that bad. To the contrary, it gives this lovely “analogue” charme to the picture.

I will post a few more pictures / notes about backlighting, but like in this shot I’m a big fan of a strong light source (read: sun) peaking from behind the main subject, producing some light spill / flare and, more importantly, some a nice, defining rim light.

I should have brought my camera

Carton Avenue, Maynooth, Ireland, 2010

… or should I? Well, yes and no.

Saturday was a beautiful autumn day here on the east coast of Ireland. As Steffi wanted to get some baking and cooking done, I took lil’ Sophie for a walk (well, ride in her buggy). As I came up towards Carton Avenue and this beautiful scene opened up in front of my eyes, I started kicked myself: Why did I not bring my camera?!

Well, I just forgot. And I decided I was too lazy to go back and get it. Instead, I grabbed my phone and tried my best to capture the scene. Of course, you don’t have things like RAW capture on your phone which could have easily dealt with the somewhat larger but not too large dynamic range of the scene. I didn’t have a modern enough phone to have HDR capture right built into the the phone either, nor did I have an app like that installed…

So, I tried to do it manually: I tried to hold the phone steady and took three photos, first focussing (and thus taking the exposure measurement) at the brightest point (the sky), then middle brightness (trees on the left), and lastly in the shadows (bottom right). The resulting bracket of three photos (each roughly one stop apart, judging by the EXIF) was then thrown into my favourite free software: ImageFuser which after some minor fiddling with the parameters produced something close to the above. Some more post-processing in Photoshop (increase saturation and contrast, add vignette) and the result ain’t too bad!

Only thing missing: resolution. I guess I just have to bring a “proper” camera next time…

Sony Alpha 55 and Alpha 900 Color Profiles

Equipment-tub, Maynooth, Ireland, 2010

This really should be the last nerd entry. Promise.

Up for grabs today are colour profiles for all my lenses (technically peaking, they are camera profiles, but colour profiles is more to the point), both measured on two different camera bodies, the Sony Alpha 900 and Sony Alpha 55.

What are they for? Well, they are meant to create rather neutral and consistent colours among all the different lenses (with their different kinds of glas, coatings, etc.) in my camera bag. I use them all the time and they have served me very well.

All profiles were measured using a Gretag Macbeth® Color Checker® under both day light and tungsten light, in conjunction with Adobe's free DNG Profile Editor. The lenses included are:

Prime lenses:Zoom lenses:
8mm F3.5 Fisheye (Peleng)10-24mm F3.5-4.5 (Tamron)
16mm F2.8 Fisheye (Sony)17-35mm F2.8-4 (Minolta)
35mm F1.4 G (Sony)24-70mm F2.8 ZA SSM (Sony)
50mm F1.4 (Minolta)70-200mm F2.8 G SSM (Sony)
85mm F1.4 G (Minolta)70-300mm F4.5-5.6 G SSM (Sony)
100mm F2.8 Macro (Minolta) 
135mm F1.8 ZA (Sony) 

You can read more about installing these profiles here. And now, for the download:

Color profiles for the Sony A55Color profiles for the Sony A900

As always, I’d like to ask for a small dona­tion for the time and work involved in cre­at­ing these pro­files and pol­ish­ing them for pub­lic release.

Thank you!

Sony Alpha 55 vs. Alpha 900 ISO series

Sony Alpha 55 at ISO 12800 in rather dim light, Maynooth, Ireland, 2010

Ok, one more no-so-artsy but rather technical post.

I recently got a new camera, mainly to shoot video with it. However, this camera (the Sony Alpha SLT 55) has generated quite some stir due to its unique and somewhat novel design, and apart from that, as always when there’s a new camera and sensor folks on forums have shown themselves quite controversy about its noise performance.

To see for myself I decided to shoot this ISO series. The setup is not ideal (in hindsight, I should have had some more darker areas in the frame too) but it should do for now. It shows a bunch of toys lit indirectly by rather dim light (a 40W incandescent light bulb lamp shining up a wall about 2m away). To give you an idea of the dimly-ness of the shot, the EXIF reports a brightness value of -2.75 EV, and the ISO 800 shots for instance needed a 6s exposure at ƒ/8. All pictures were taken from a tripod, from the same position, but at different focal lengths to get identical crops, with a 2s timer and SSS off to get as sharp pictures as possible.

The series shows the photos from the α55 and the α900 right next to each other at equal ISOs, running the ISO from 200 to 12800. Since the α900 only goes up to 6400 I shot an extra frame at ISO 6400 but one stop underexposed and then raised the exposure again by one stop in post-processing to simulate ISO 12800 that way.

Speaking of post-processing — all images were shot in RAW mode and then converted with Adobe LightRoom 3 (with the 2010 process version) with zero noise reduction and zero sharpening applied. All other sliders were also left alone, except for the white balance which was set to 2600. Then I reduced the size of the α900 pictures to the exact pixel dimension of the α55 to make for a fair comparison. In other words, all strips are taken from 16 megapixel images.

Phew. So much for the experimental setup. The result? Well, see for yourself. But in my eyes, both cameras are pretty much identical in terms of noise performance, provided you take the different resoultions into account! (That reminds me of the α900 vs Nikon D700 debate back in the day…). And, guys, it’s really not as bad as many pixel peepers are trying to make you think.

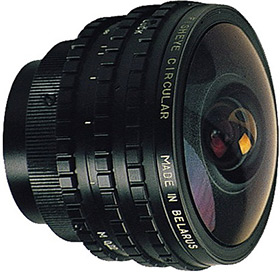
Peleng 8mm F3.5 Fisheye Adobe Lens Profile

Ok, last one …

Here are some profiles for the Peleng MC 8mm F3.5 Fisheye, profiled on a Sony Alpha 900 (DSLR-A900) body. For some reason, the lens, when mounted to my A900, is somewhat decentered, that is the image circle it creates is offset a little bit to the right, and also cropped ever so slightly on the long edges.

I shot the following series: 5 Apertures [4.0, 5.6, 8.0, 11.0, 16.0] x 1 focus distance [0.40m], resulting in a total of 45 pictures used in the calibration process. Again, the ZIP file contains a two different files — one that contains the lens profile and one that contains the DNG color profile to give you more accurate colours. Since this purely manual lens does not exchange any information with the camera, in order to make these profiles work for you, I recommand that you manually set the aperture for this lens. I’ll might write a post on how to do this further down the line.

Peleng 8mm Fisheye + Sony Alpha 900 profiles

As you may know, creating such profiles takes a considerable amount of time and large prints of the calibration charts as well as a colour checker. If you find these profiles useful, please consider a small donation (conveniently via PayPal):

Thank you!

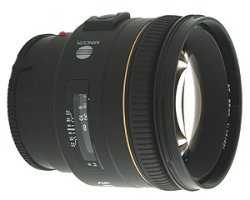
Minolta 85mm F1.4 G Adobe Lens Profile

For now that’ll be it (all the other lenses I use have been profiled by other people already) — the last lens in my series of Adobe Camera Raw Lens Profiles is my favourite “portrait machine”.

It’s the Minolta AF 85mm F1.4 G fast prime, profiled on a Sony Alpha 900 (DSLR-A900) body. However, this profile should also work well for its other Minolta versions as well as when mounted on an Alpha 850 body.

I shot the following series: 8 Apertures [1.4, 2.0 2.8, 4.0, 5.6, 8.0, 11.0, 16.0] x 3 Focus distances [0.85m, 2m, 6m], resulting in a total of almost 200 pictures used in the calibration process. Again, the ZIP file contains a bunch of different files — one that contains all the sub profiles in one file, as well as three separate files for the different focus distances (since you can’t select sub profiles in LightRoom at the time of writing).

And again, there’s more. As a goodie I’m also throwing in my DNG colour profile for this lens (again, mounted to an A900), measured both for tungsten and day light (using a MacBeth ColorChecker and Adobe’s DNG profile editor) which should give you much more accurate colours than using the default profiles supplied by Adobe.

Download Minolta 85mm F1.4G profiles

As you may know, creating such profiles takes a considerable amount of time and large prints of the calibration charts as well as a colour checker. If you find these profiles useful, please consider a small donation (conveniently via PayPal):

Thank you!